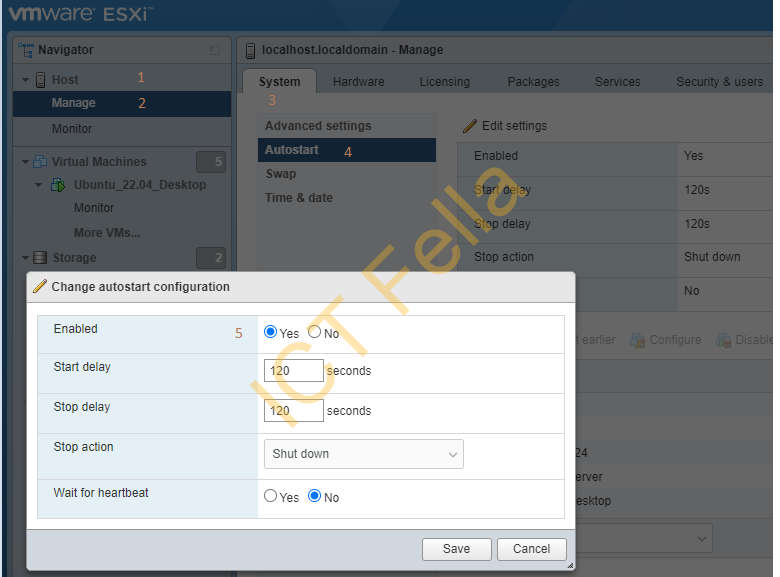
Introduction: Virtual Machine Autostart is a valuable feature in VMware ESXi that allows you to automate the startup and shutdown of virtual machines. By configuring Autostart settings, you can ensure that critical VMs are launched automatically after a host reboot, power failure, or other unexpected events. This blog post will guide you through the process of configuring VM Autostart in VMware ESXi.
Step 1: Accessing ESXi Host Through vSphere Client
- Launch the VMware vSphere Client on your computer.
- Connect to your ESXi host using the appropriate credentials (username and password).
Step 2: Navigating to Autostart Settings
- In the vSphere Client, select the ESXi host from the inventory panel on the left.
- Navigate to the “Configure” tab for the selected host.
- Under the “System” section, click on “Autostart”.

Step 3: Configuring Autostart
- In the Autostart settings page, you will see a list of virtual machines configured for Autostart (if any).
- To add a new VM to Autostart, click on “Edit Autostart Order”.
- In the “Edit Autostart Order” window, click on “Add VM” to select the virtual machine you want to configure for Autostart.
- Choose the desired VM from the list and click “OK” to add it to the Autostart order.
- You can adjust the startup sequence by using the arrow buttons to move VMs up or down in the list.
- Optionally, you can configure delay settings for VM startup and shutdown to stagger the startup process and avoid resource contention.

Step 4: Enabling Autostart
- Once you have configured the Autostart order, click “OK” to save your changes.
- Back in the Autostart settings page, ensure that the “Enable virtual machine autostart” checkbox is checked.
- Adjust any additional settings as needed, such as enabling or disabling the Autostart feature for specific VMs.
