This tutorial is to illustrate the processes to configure Juniper EX switch virtual chassis and JUNOS upgrade procedures. This is one of the most common tasks in the Juniper networking world.
Environment
- 2x Juniper EX-2300/3400/4300 switches with 10/40/40Gbps Juniper DAC cables
- 1 x USB drive with recommended JUNOS in it, filesystem format FAT32, JUNOS is Service Request Version and downloaded from https://kb.juniper.net/InfoCenter/index?page=content&id=KB21476. Please DO NOT use the newest version, I mean MUST NOT really.
- Console cable
Virtual Chassis with nonprovisoned configuration file
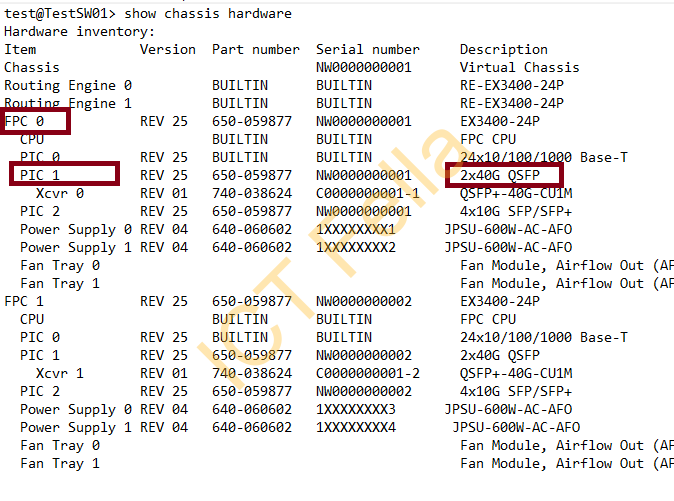
- Check the ports number etc via show chassis hardware, from here you can see port can be used for Virtual Chassis, please note either 10G or 40G can be use for virutal chassis
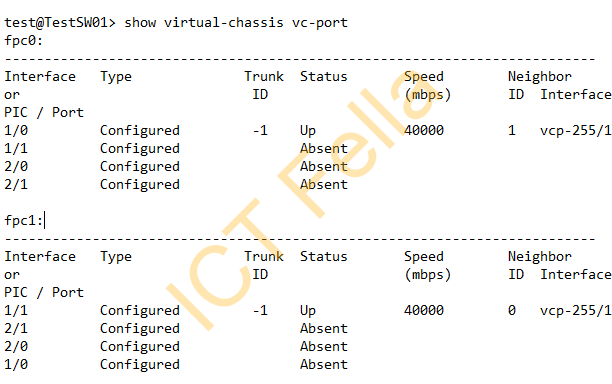
2. Then you can check the current vc-port configuration via show virtual-chassis vc-port, there might be ports configured with virtual chassis by default, If that is the case, you can use the port directly without any configuration, it is called “Nonprovisioned config file” mode
3. To configure the customized VC port, using the command “request virtual-chassis vc-port set pic-slot x port x“, X means the port number from the output of “show chassis hardware”, for example
request virtual-chassis vc-port set pic-slot 1 port 1
4. connect the cable up and reboot both switches via “request system reboot“, once both switches come up, they will elect a member as “Master or Backup”
Virtual Chassis via the provisioned config file
On top of the listed procedures listed above for “nonprovisioned configuration file”, when you want to define which member to be the first switch (member 0) and which to be the second (member 1). Set up the config as below:
set system commit synchronize
set chassis redundancy graceful-switchover
set routing-options nonstop-routing
set protocols layer2-control nonstop-bridging
set virtual-chassis preprovisioned
set virtual-chassis no-split-detection
set virtual-chassis member 0 role routing-engine
set virtual-chassis member 0 serial-number TA1111111111
set virtual-chassis member 1 role routing-engine
set virtual-chassis member 1 serial-number TA2222222222
Finally, you can run “show virtual-chassis” to check the status
JUNOS Upgrade via USB drive
Just remind about the Junos version again
- Connect USB drive onto the switch and it will pop out the device name of that USB drive, do a “ls” to find out the exact name:
ls /dev/da*
2. mount the USB drive to path /mnt, for example, da1s1 is the USB device name
mount_msdosfs /dev/da1s1 /mnt
3. Copy the Junos tarball file to local temp folder /var/tmp, please put the correct name in.
cp /mnt/ju…..tgz /var/tmp
4. install the software via the command below
request system software add /var/tmp/ju……tgz no-validate
5. restart the switches to complete the installation
request system reboot
6. Clean up the storage, remove the unused tarball Junos file in /var/tmp
request system storage cleanup
Reset Juniper switch to the factory default
- [edit]
user@switch# load factory-default - [edit]
user@switch# delete system commit factory-settings - [edit]
user@switch# set system root-authentication plain-text-password - [edit] commit
Remove virtual chassis configuration from Shell
This is very helpful when you messed up the virtual config and want to start from scratch, please be aware factory default may not delete the virtual chassis config
root@TestSW02> start shell
root@TestSW02:RE:0% cd /config/vchassis/
root@TestSW02:RE:0% ls
vc.db vc.tlv.db.0 vclocal.conf.tlv.0
vc.param vclocal.conf
vc.tlv.db vclocal.conf.tlv
root@TestSW02:RE:0% rm *
Useful links
https://www.mist.com/documentation/virtual-chassis/
https://kb.juniper.net/InfoCenter/index?page=content&id=KB20552&actp=METADATA
Good day! Do you use Twitter? I’d like to follow
you if that would be ok. I’m absolutely enjoying your blog and look forward to new updates.
Sure, you can simply search “ictfella” on Twitter, or go to my home page, on the top right corner, you can see the Twitter icon. I am glad you enjoyed it.